

1. Reason
Why the inverter happens overvoltage tripping or power reduction occurs?
It may be one of the following reasons:
1) Your local grid is already operating outside the local Standard voltage limits (or wrong regulation settings). For example, in Australia, AS 60038 specifies 230 volts as the nominal grid voltage with a. +10%, -6% range, so an upper limit of 253V. If this is the case then your local Grid company has a legal obligation to fix the voltage. Usually by modifying a local transformer.
2) Your local grid is just under the limit and your solar system, although installed correctly and to all the standards, pushes the local grid just over the tripping limit. Your solar inverter’s output terminals are connected to a ‘Connection Point’ with the grid by a cable. This cable has an electrical resistance that creates a voltage across the cable whenever the inverter exports power by sending electrical current into the grid. We call this a ‘voltage rise’. The more your solar exports the bigger the voltage rise thanks to Ohm’s Law (V=IR), and the higher the resistance of the cabling the bigger the voltage rise.
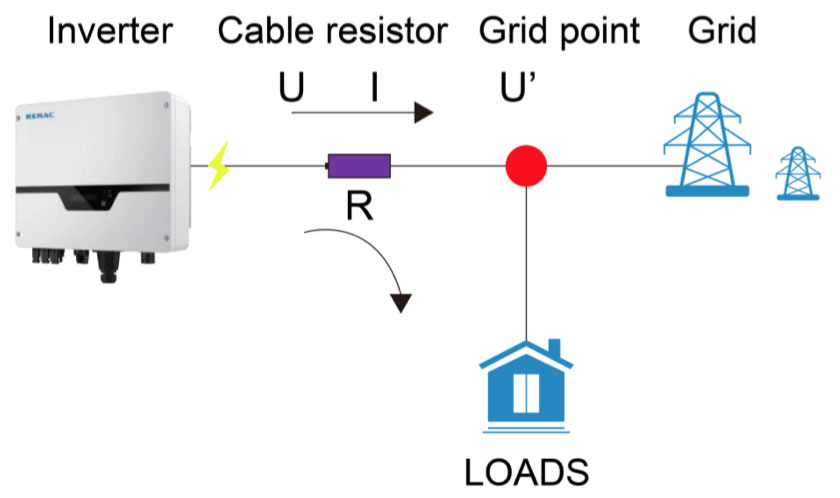
For example, in Australia, the Australian Standard 4777.1 says that the maximum voltage rise in a solar installation must be 2% (4.6V).
So you may have an installation that meets this standard, and has a voltage rise of 4V at full export. Your local grid may also meet the standard and be at 252V.
On a good solar day when no one is home, the system exports almost everything to the grid. The voltage is pushed up to 252V + 4V = 256V for over 10 minutes and the inverter trips.
3) The maximum voltage rise between your solar inverter and the grid is above t he 2% maximum in the Standard, because the resistance in the cable (including any connections) is too high. If this is the case then the installer should have advised you that your AC cabling to the grid needed upgrading before solar could be installed.
4) Inverter hardware issue.
If the measured Grid voltage is always within the range, but the inverter always has overvoltage tripping error no matter how wide the voltage range is, it should be hardware issue of the inverter, it may be that the IGBTs are damaged.
2. Diagnosis
Test Your Grid Voltage To test your local grid voltage, it must be measured while your solar system is powered off. Otherwise the voltage you measure will be affected by your solar system, and you can’t lay the blame on the grid! You need to prove that the grid voltage is high without your solar system operating. You should also turn all the big loads in your house off.
It should also be measured on a sunny day around noon – as this will take into account the voltage rises caused by any other solar systems around you.
First – record the instantaneous reading with a multimeter. Your sparky should take an instantaneous voltage reading at the main switchboard. If the voltage is greater than the limited voltage, then take a photo of the multimeter (preferably with the solar supply main switch in the off position in the same photo) and send it to your Grid company’s power quality department.
Secondly – record the 10 minute average with a voltage logger. Your sparky needs a voltage logger (i.e. Fluke VR1710) and should measure the 10 min average peaks with your solar and big loads switched off. If the average is above the limited voltage then send the recorded data and a picture of the measurement setup – again preferably showing the solar supply main switch off.
If either of the above 2 tests is ‘positive’ then pressure your Grid company to fix your local voltage levels.
Verify the voltage drop in your installation
If the calculations show a voltage rise of more than 2% then you will need to upgrade the AC cabling from your inverter to the grid Connection Point so the wires are fatter (fatter wires = lower resistance).
Final Step – measure the voltage rise
1. If your grid voltage is OK and the voltage rise calculations are less than 2% then your sparky needs to measure the problem to confirm the voltage rise calculations:
2. With PV off, and all other load circuits off, measure the no-load supply voltage at main switch.
3. Apply a single known resistive load e.g. heater or oven/hotplates and measure the current draw in the actives, neutral and earth and the on load supply voltage at main switch.
4. From this you can calculate the voltage drop / rise in the incoming consumer main and service main.
5. Calculate the line AC resistance via Ohm’s Law to pick up on things like bad joints or broken neutrals.
3. Conclusion
Next Steps
Now you should know what your problem is.
If it is problem #1 - grid voltage too high- then that is your Grid company’s problem. If you send them all the evidence I’ve suggested they will be obliged to fix it.
If it is problem #2 - grid is OK, voltage rise is less than 2%, but it still trips then your options are:
1. Depending on your Grid company you may be allowed to change the inverter 10 minute average voltage trip limit to the allowed value (or if you are very lucky even higher). Get your sparky to check with the Grid Company if you are allowed to do this.
2. If your inverter has “Volt/Var” mode (most modern ones do) – then ask your installer to enable this mode with the set points recommended by your local Grid company – this can reduce the amount and severity of over voltage tripping.
3. If that is not possible then, if you have 3 a phase supply, upgrading to a 3 phase inverter usually solves the issue – as the voltage rise is spread over 3 phases.
4. Otherwise you are looking at upgrading your AC cables to the grid or limiting the export power of your solar system.
If it is problem #3 - max voltage rise over 2% – then if it is a recent installation it looks like your installer has not installed the system to the Standard. You should talk to them and work out a solution. It will most likely involve upgrading the AC cabling to the grid (use fatter wires or shorten the cable between inverter and Grid connection point).
If it is problem #4 – Inverter hardware problem. Call technical support to offer the replacement.